In this tutorial series , I'll be showing you how to build a functional and secure chat app using the latest React Native libraries, including Gifted Chat and the Expo framework powered by the ChatKitty platform.
In the first article of this series,
you learned how to use Firebase along with ChatKitty Chat Functions to implement a secure yet simple
user login flow by proxying Firebase Authentication through ChatKitty. Along with that, you built a couple
of screens with the react-native-paper UI library to allow users to register for your chat app and login
into the app.
In this tutorial, you'll be using the Gifted Chat React Native library to create a full-featured chat screen with its out of the box features. You'll also use ChatKitty's JavaScript Chat SDK to add real-time messaging to your chat app.
After reading this article, you will be able to:
Create public channels for users to join
View all channels a user can join and discover channels created by other users
Integrate the
react-native-gifted-chatlibrary to implement a group chat screen
You can check out our Expo React Native sample code any time on GitHub.
If you followed along the last article, you should already have the ChatKitty JavaScript SDK NPM package added to your Expo React Native project.
Before we begin, let's go over some terms we'll be using a lot in this article.
What are channels?
Channels are the backbone of the ChatKitty chat experience. Users can join channels and receive or send messages. ChatKitty broadcasts messages created in channels to channel member users with active chat sessions and sends notifications to offline members.
What are chat sessions?
Before a user can begin sending and receiving real-time messages and use in-app chat features like typing indicators, delivery and read receipts, live reactions, etc, their device needs to start a chat session. A user device can start up to 10 chat sessions at a time but usually have only a maximum of one active at a time. You can think of an active chat session as corresponding to being in a "chat room", when the user "leaves" the chat room, its chat session ends.
With that, you have all the information you need build to chat into your app.
Let's go! 🏎️
First, you'll start by creating a screen that shows a list of channels a user can chat in after logging in.
Displaying a user's channels
Start by changing the homeScreen.js you previously created to list the channels a logged-in user
is a member of.
The homeScreen.js file should contain:
import { useIsFocused } from '@react-navigation/native';
import React, { useEffect, useState } from 'react';
import { FlatList, StyleSheet, View } from 'react-native';
import { Divider, List } from 'react-native-paper';

import { chatkitty } from '../chatkitty';
import Loading from '../components/loading';

export default function HomeScreen() {
  const [channels, setChannels] = useState([]);
  const [loading, setLoading] = useState(true);

  const isFocused = useIsFocused();

  useEffect(() => {
    let isCancelled = false;

    chatkitty.listChannels({ filter: { joined: true } }).then((result) => {
      if (!isCancelled) {
        setChannels(result.paginator.items);

        if (loading) {
          setLoading(false);
        }
      }
    });

    return () => {
      isCancelled = true;
    };
  }, [isFocused, loading]);

  if (loading) {
    return <Loading />;
  }

  return (
    <View style={styles.container}>
      <FlatList
        data={channels}
        keyExtractor={(item) => item.id.toString()}
        ItemSeparatorComponent={() => <Divider />}
        renderItem={({ item }) => (
          <List.Item
            title={item.name}
            description={item.type}
            titleNumberOfLines={1}
            titleStyle={styles.listTitle}
            descriptionStyle={styles.listDescription}
            descriptionNumberOfLines={1}
            onPress={() => {
              // TODO navigate to a chat screen.
            }}
          />
        )}
      />
    </View>
  );
}

const styles = StyleSheet.create({
  container: {
    backgroundColor: '#f5f5f5',
    flex: 1
  },
  listTitle: {
    fontSize: 22
  },
  listDescription: {
    fontSize: 16
  }
});
If you run the app and log in now, it shouldn't look like much.

Pretty empty, huh? Soon you'll create a screen responsible for creating new channels, so the home screen can be populated.
Creating shared header components and a modal stack navigator
Before we create the CreateChannel screen, we should modify the app header bar to share options across different screens. The CreateChannel screen will be implemented as a modal, so we'll also need a separate stack navigator to wrap the home stack navigator and handle modals. Modals are screens that block interactions with the main view when displaying their content.
Modify your homeStack.js file in the src/context/ directory to apply header bar options across
screens and define a stack navigator for app modal screens.
The homeStack.js file should contain:
import { createStackNavigator } from '@react-navigation/stack';
import React from 'react';

import HomeScreen from '../screens/homeScreen';

const ChatStack = createStackNavigator();
const ModalStack = createStackNavigator();

export default function HomeStack() {
  return (
    <ModalStack.Navigator screenOptions={{
      headerShown: false,
      presentation: 'modal'
    }}>
      <ModalStack.Screen name='ChatApp' component={ChatComponent} />
    </ModalStack.Navigator>
  );
}

function ChatComponent() {
  return (
    <ChatStack.Navigator
      screenOptions={{
        headerStyle: {
          backgroundColor: '#5b3a70'
        },
        headerTintColor: '#ffffff',
        headerTitleStyle: {
          fontSize: 22
        }
      }}
    >
      <ChatStack.Screen name='Home' component={HomeScreen} />
    </ChatStack.Navigator>
  );
}
Creating a channel creation screen
Now we can create a new screen file createChannelScreen.js inside the src/screens/ directory. From
this screen, users will create new public channels other users can join and chat in.
The createChannelScreen.js file should contain:
import React, { useState } from 'react';
import { StyleSheet, View } from 'react-native';
import { IconButton, Title } from 'react-native-paper';

import { chatkitty } from '../chatkitty';
import FormButton from '../components/formButton';
import FormInput from '../components/formInput';

export default function CreateChannelScreen({ navigation }) {
  const [channelName, setChannelName] = useState('');

  function handleButtonPress() {
    if (channelName.length > 0) {
      chatkitty
        .createChannel({
          type: 'PUBLIC',
          name: channelName
        })
        .then(() => navigation.navigate('Home'));
    }
  }

  return (
    <View style={styles.rootContainer}>
      <View style={styles.closeButtonContainer}>
        <IconButton
          icon='close-circle'
          size={36}
          iconColor='#5b3a70'
          onPress={() => navigation.goBack()}
        />
      </View>
      <View style={styles.innerContainer}>
        <Title style={styles.title}>Create a new channel</Title>
        <FormInput
          labelName='Channel Name'
          value={channelName}
          onChangeText={(text) => setChannelName(text)}
          clearButtonMode='while-editing'
        />
        <FormButton
          title='Create'
          modeValue='contained'
          labelStyle={styles.buttonLabel}
          onPress={() => handleButtonPress()}
          disabled={channelName.length === 0}
        />
      </View>
    </View>
  );
}

const styles = StyleSheet.create({
  rootContainer: {
    flex: 1
  },
  closeButtonContainer: {
    position: 'absolute',
    top: 30,
    right: 0,
    zIndex: 1
  },
  innerContainer: {
    flex: 1,
    justifyContent: 'center',
    alignItems: 'center'
  },
  title: {
    fontSize: 24,
    marginBottom: 10
  },
  buttonLabel: {
    fontSize: 22
  }
});
Okay, let's test the CreateChannel screen by adding a temporary button to open the screen in our home screen header bar, and creating a new channel.
The homeStack.js file should contain:
import { createStackNavigator } from '@react-navigation/stack';
import React from 'react';
import { IconButton } from 'react-native-paper';

import CreateChannelScreen from '../screens/createChannelScreen';
import HomeScreen from '../screens/homeScreen';

const ChatStack = createStackNavigator();
const ModalStack = createStackNavigator();

export default function HomeStack() {
  return (
    <ModalStack.Navigator screenOptions={{
      headerShown: false,
      presentation: 'modal'
    }}>
      <ModalStack.Screen name='ChatApp' component={ChatComponent} />
      <ModalStack.Screen name='CreateChannel' component={CreateChannelScreen} />
    </ModalStack.Navigator>
  );
}

function ChatComponent() {
  return (
    <ChatStack.Navigator
      screenOptions={{
        headerStyle: {
          backgroundColor: '#5b3a70'
        },
        headerTintColor: '#ffffff',
        headerTitleStyle: {
          fontSize: 22
        }
      }}
    >
      <ChatStack.Screen
        name='Home'
        component={HomeScreen}
        options={({ navigation }) => ({
          headerRight: () => (
            <IconButton
              icon='plus'
              size={28}
              iconColor='#ffffff'
              onPress={() => navigation.navigate('CreateChannel')}
            />
          )
        })}
      />
    </ChatStack.Navigator>
  );
}
If you run the app now, you should see a plus icon in the header bar:

Tap the button and create a new channel:

Tap "Create", and you should be redirected back to the home screen with your new channel:

You now have a channel to send messages, receive messages and chat in. Next, let's get started
building a channel chat screen with the react-native-gifted-chat library.
Creating a chat screen
Gifted Chat is an open-source React Native library that saves you tons of time and development effort building chat UIs. The library is extensible and customizable with a large online community making it a great option to build chat.
To use Gifted Chat, add its NPM package to your Expo React Native project:
npx expo install react-native-gifted-chat
Next, create a file chatScreen.js inside the src/screens/ directory. This screen will render a chat
screen for users to send new messages and view messages they've sent and received. We'll be updating this
screen throughout the rest of this tutorial series to add more advanced and sophisticated chat features.
chatScreen.js will need quite a few things, so let's break down what you'll be doing:
Import
GiftedChatsince we need a GiftedChat component to add the chat UI and functionality.Retrieve the current user from our authentication context, so we can show messages as created by the current user and perform other current user specific functions.
Retrieve the channel to start this chat with using the
routeprops.Create a
ChatScreenfunctional React component, and inside it define amessagesstate variable. This array will hold message data objects representing the chat message history. This variable is initially an empty array.Define a couple of helper functions
mapUserandmapMessageto map the current user and message objects we get from ChatKitty into a schema Gifted Chat recognizes.Use an
useEffectReact hook to start a new chat session with the ChatScreen channel using theChatKittystartChatSessionfunction. Register anonMessageReceivedfunction that appends new messages received from ChatKitty into the existing Gifted Chat managed messages, and replace themessagesstate when a new message is received. After starting the chat session, fetch the channel's last messages usinglistMessagesthen replace themessagesstate. As part of cleaning up when the component is about to be destroyed, return theChatSession'sendfunction to theuseEffectfunction to end the chat session and free up ChatKitty resources.Define a helper function
handleSend, to send a new message using theChatKittysendMessagefunction.Return to be rendered a
GiftedChatwith themessagesstate, a mapped GiftedChat current userchatUser, and thehandleSendhelper function.
The chatScreen.js file should contain:
import React, { useContext, useEffect, useState } from 'react';
import { Bubble, GiftedChat } from 'react-native-gifted-chat';

import { chatkitty } from '../chatkitty';
import Loading from '../components/loading';
import { AuthContext } from '../context/authProvider';

export default function ChatScreen({ route }) {
  const { user } = useContext(AuthContext);
  const { channel } = route.params;

  const [messages, setMessages] = useState([]);
  const [loading, setLoading] = useState(true);

  useEffect(() => {
    const startChatSessionResult = chatkitty.startChatSession({
      channel: channel,
      onMessageReceived: (message) => {
        setMessages((currentMessages) =>
          GiftedChat.append(currentMessages, [mapMessage(message)])
        );
      }
    });

    chatkitty
      .listMessages({
        channel: channel
      })
      .then((result) => {
        setMessages(result.paginator.items.map(mapMessage));

        setLoading(false);
      });

    return startChatSessionResult.session.end;
  }, [user, channel]);

  async function handleSend(pendingMessages) {
    await chatkitty.sendMessage({
      channel: channel,
      body: pendingMessages[0].text
    });
  }

  function renderBubble(props) {
    return (
      <Bubble
        {...props}
        wrapperStyle={{
          left: {
            backgroundColor: '#d3d3d3'
          }
        }}
      />
    );
  }

  if (loading) {
    return <Loading />;
  }

  return (
    <GiftedChat
      messages={messages}
      onSend={handleSend}
      user={mapUser(user)}
      renderBubble={renderBubble}
    />
  );
}

function mapMessage(message) {
  return {
    _id: message.id,
    text: message.body,
    createdAt: new Date(message.createdTime),
    user: mapUser(message.user)
  };
}

function mapUser(user) {
  return {
    _id: user.id,
    name: user.displayName,
    avatar: user.displayPictureUrl
  };
}
Now, let's add the Chat screen to the home stack navigator. Edit homeStack.js in src/context/
with a new screen entry.
The homeStack.js file should contain:
import { createStackNavigator } from '@react-navigation/stack';
import React from 'react';
import { IconButton } from 'react-native-paper';

import ChatScreen from '../screens/chatScreen';
import CreateChannelScreen from '../screens/createChannelScreen';
import HomeScreen from '../screens/homeScreen';

const ChatStack = createStackNavigator();
const ModalStack = createStackNavigator();

export default function HomeStack() {
  return (
    <ModalStack.Navigator screenOptions={{
      headerShown: false,
      presentation: 'modal'
    }}>
      <ModalStack.Screen name='ChatApp' component={ChatComponent} />
      <ModalStack.Screen name='CreateChannel' component={CreateChannelScreen} />
    </ModalStack.Navigator>
  );
}

function ChatComponent() {
  return (
    <ChatStack.Navigator
      screenOptions={{
        headerStyle: {
          backgroundColor: '#5b3a70'
        },
        headerTintColor: '#ffffff',
        headerTitleStyle: {
          fontSize: 22
        }
      }}
    >
      <ChatStack.Screen
        name='Home'
        component={HomeScreen}
        options={({ navigation }) => ({
          headerRight: () => (
            <IconButton
              icon='plus'
              size={28}
              iconColor='#ffffff'
              onPress={() => navigation.navigate('CreateChannel')}
            />
          )
        })}
      />
      <ChatStack.Screen
        name='Chat'
        component={ChatScreen}
        options={({ route }) => ({
          title: route.params.channel.name
        })}
      />
    </ChatStack.Navigator>
  );
}
Before we can begin chatting, you'll need to update the homeScreen.js component to redirect to a
Channel screen.
The homeScreen.js file should contain:
import { useIsFocused } from '@react-navigation/native';
import React, { useEffect, useState } from 'react';
import { FlatList, StyleSheet, View } from 'react-native';
import { Divider, List } from 'react-native-paper';

import { chatkitty } from '../chatkitty';
import Loading from '../components/loading';

export default function HomeScreen({ navigation }) {
  const [channels, setChannels] = useState([]);
  const [loading, setLoading] = useState(true);

  const isFocused = useIsFocused();

  useEffect(() => {
    let isCancelled = false;

    chatkitty.listChannels({ filter: { joined: true } }).then((result) => {
      if (!isCancelled) {
        setChannels(result.paginator.items);

        if (loading) {
          setLoading(false);
        }
      }
    });

    return () => {
      isCancelled = true;
    };
  }, [isFocused, loading]);

  if (loading) {
    return <Loading />;
  }

  return (
    <View style={styles.container}>
      <FlatList
        data={channels}
        keyExtractor={(item) => item.id.toString()}
        ItemSeparatorComponent={() => <Divider />}
        renderItem={({ item }) => (
          <List.Item
            title={item.name}
            description={item.type}
            titleNumberOfLines={1}
            titleStyle={styles.listTitle}
            descriptionStyle={styles.listDescription}
            descriptionNumberOfLines={1}
            onPress={() => navigation.navigate('Chat', { channel: item })}
          />
        )}
      />
    </View>
  );
}

const styles = StyleSheet.create({
  container: {
    backgroundColor: '#f5f5f5',
    flex: 1
  },
  listTitle: {
    fontSize: 22
  },
  listDescription: {
    fontSize: 16
  }
});
If you run the app, you should now be able to send messages in the channel you created:
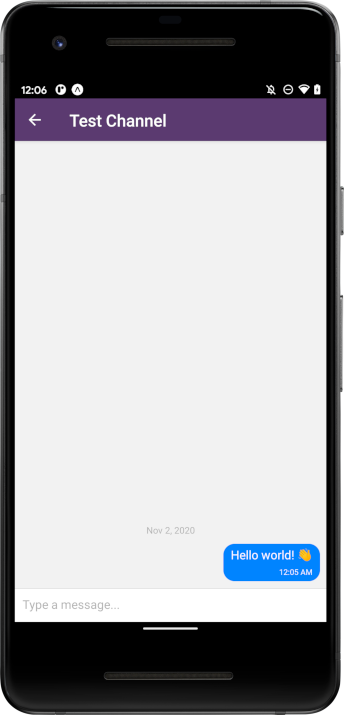
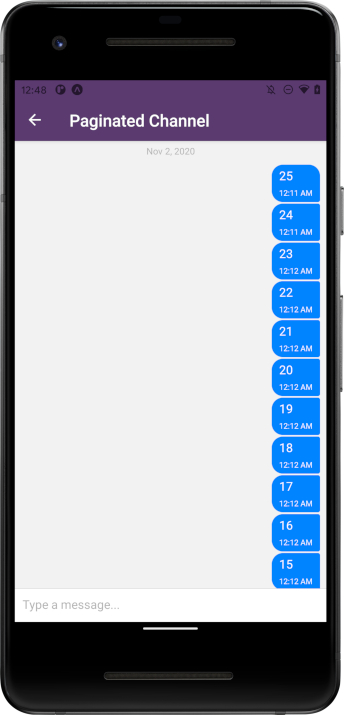
Awesome! You've successfully added chat into your app. However, before we bring out the champagne there's a couple of things we should do. Firstly, we're currently only getting a slice of the channel message history, as the ChatKitty API paginates all collections. Currently, if the channel had more than the default messages page size (25 items) messages, then the messages response would be truncated and messages older than the 25th message would not be returned.
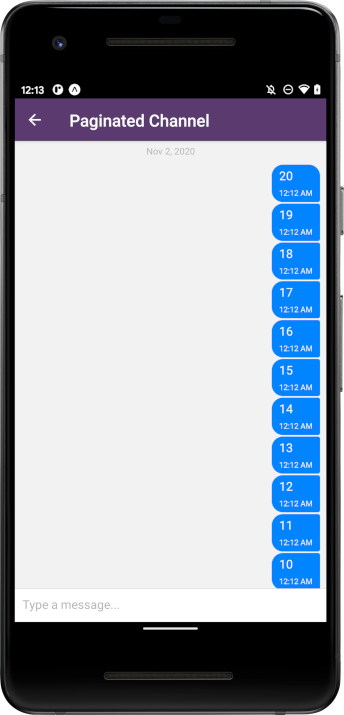
We can't see messages before 25.
Secondly, although it's nice we can chat with ourselves, it'll be really cool if users can find channels created by other users, or by your backend that they have permission to join. We can create a browse channel screen for users to see public channels created by other users.
Loading earlier messages
To load older messages in pages before the last channel page, we can use the paginator object returned
with the ChatKitty listMessages result to fetch more pages and prepend the messages fetched into our
messages collection.
// Fetching a next page:

const result = chatkitty.listMessages({ channel: channel });

const paginator = result.paginator; // paginator from result

if (paginator.hasNextPage) { // check if there are more pages
  const nextPaginator = await messagePaginator.nextPage();

  const nextMessages = nextPaginator.items;
}
Now, let's use paginators to load more messages into our chat. Edit the chatScreen.js file in
src/screens/ to load more messages using Gifted Chat.
The chatScreen.js file should contain:
import React, { useContext, useEffect, useState } from 'react';
import { Bubble, GiftedChat } from 'react-native-gifted-chat';

import { chatkitty } from '../chatkitty';
import Loading from '../components/loading';
import { AuthContext } from '../context/authProvider';

export default function ChatScreen({ route }) {
  const { user } = useContext(AuthContext);
  const { channel } = route.params;

  const [messages, setMessages] = useState([]);
  const [loading, setLoading] = useState(true);
  const [loadEarlier, setLoadEarlier] = useState(false);
  const [isLoadingEarlier, setIsLoadingEarlier] = useState(false);
  const [messagePaginator, setMessagePaginator] = useState(null);

  useEffect(() => {
    const startChatSessionResult = chatkitty.startChatSession({
      channel: channel,
      onMessageReceived: (message) => {
        setMessages((currentMessages) =>
          GiftedChat.append(currentMessages, [mapMessage(message)])
        );
      }
    });

    chatkitty
      .listMessages({
        channel: channel
      })
      .then((result) => {
        setMessages(result.paginator.items.map(mapMessage));

        setMessagePaginator(result.paginator);
        setLoadEarlier(result.paginator.hasNextPage);

        setLoading(false);
      });

    return startChatSessionResult.session.end;
  }, [user, channel]);

  async function handleSend(pendingMessages) {
    await chatkitty.sendMessage({
      channel: channel,
      body: pendingMessages[0].text
    });
  };

  async function handleLoadEarlier() {
    if (!messagePaginator.hasNextPage) {
      setLoadEarlier(false);

      return;
    }

    setIsLoadingEarlier(true);

    const nextPaginator = await messagePaginator.nextPage();

    setMessagePaginator(nextPaginator);

    setMessages((currentMessages) =>
      GiftedChat.prepend(currentMessages, nextPaginator.items.map(mapMessage))
    );

    setIsLoadingEarlier(false);
  }

  function renderBubble(props) {
    return (
      <Bubble
        {...props}
        wrapperStyle={{
          left: {
            backgroundColor: '#d3d3d3'
          }
        }}
      />
    );
  }

  if (loading) {
    return <Loading />;
  }

  return (
    <GiftedChat
      messages={messages}
      onSend={handleSend}
      user={mapUser(user)}
      loadEarlier={loadEarlier}
      isLoadingEarlier={isLoadingEarlier}
      onLoadEarlier={handleLoadEarlier}
      renderBubble={renderBubble}
    />
  );
}

function mapMessage(message) {
  return {
    _id: message.id,
    text: message.body,
    createdAt: new Date(message.createdTime),
    user: mapUser(message.user)
  };
}

function mapUser(user) {
  return {
    _id: user.id,
    name: user.displayName,
    avatar: user.displayPictureUrl
  };
}
If you run the app now, you should see an option to load more messages if you have a lot of messages.
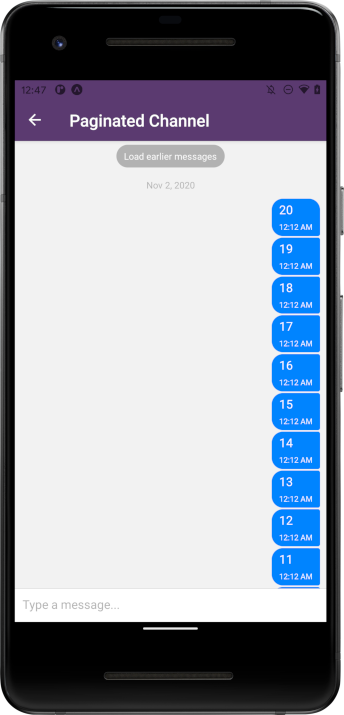
If you tap it, the next set of messages loads, repeatable until the beginning of the conversation.
Much better. Now, let's provide a screen for users to discover new channels.
Creating a browse channels screen
The browse channels screen is going to be very similar to the home screen, but instead of listing channels a user is already a member of, it will list channels a user can join.
Create a new file browseChannelsScreen.js in src/screens/. This component will display a list of joinable channels
from ChatKitty.
The browseChannelsScreen.js file should contain:
import { useIsFocused } from '@react-navigation/native';
import React, { useEffect, useState } from 'react';
import { FlatList, StyleSheet, View } from 'react-native';
import { Divider, List } from 'react-native-paper';

import { chatkitty } from '../chatkitty';
import Loading from '../components/loading';

export default function BrowseChannelsScreen({ navigation }) {
  const [channels, setChannels] = useState([]);
  const [loading, setLoading] = useState(true);

  const isFocused = useIsFocused();

  useEffect(() => {
    chatkitty.listChannels({ filter: { joined: false } }).then((result) => {
      setChannels(result.paginator.items);

      if (loading) {
        setLoading(false);
      }
    });
  }, [isFocused, loading]);

  async function handleJoinChannel(channel) {
    const result = await chatkitty.joinChannel({ channel: channel });

    navigation.navigate('Chat', { channel: result.channel });
  }

  if (loading) {
    return <Loading />;
  }

  return (
    <View style={styles.container}>
      <FlatList
        data={channels}
        keyExtractor={(item) => item.id.toString()}
        ItemSeparatorComponent={() => <Divider />}
        renderItem={({ item }) => (
          <List.Item
            title={item.name}
            description={item.type}
            titleNumberOfLines={1}
            titleStyle={styles.listTitle}
            descriptionStyle={styles.listDescription}
            descriptionNumberOfLines={1}
            onPress={() => handleJoinChannel(item)}
          />
        )}
      />
    </View>
  );
}

const styles = StyleSheet.create({
  container: {
    backgroundColor: '#f5f5f5',
    flex: 1
  },
  listTitle: {
    fontSize: 22
  },
  listDescription: {
    fontSize: 16
  }
});
Next, let's add our new screen to our home stack. Open the homeStack.js file in src/context/ and
add the BrowseChannels screen. Also, let's make it so that clicking the "Add" icon button from the home screen
takes us to the BrowseChannels screen. Then, let's create another "Add" icon button for the BrowseChannel screen that
now opens the CreateChannel screen.
The homeStack.js file should contain:
import { createStackNavigator } from '@react-navigation/stack';
import React from 'react';
import { IconButton } from 'react-native-paper';

import BrowseChannelsScreen from '../screens/browseChannelsScreen';
import ChatScreen from '../screens/chatScreen';
import CreateChannelScreen from '../screens/createChannelScreen';
import HomeScreen from '../screens/homeScreen';

const ChatStack = createStackNavigator();
const ModalStack = createStackNavigator();

export default function HomeStack() {
  return (
    <ModalStack.Navigator screenOptions={{ headerShown: false, presentation: 'modal' }}>
      <ModalStack.Screen name='ChatApp' component={ChatComponent} />
      <ModalStack.Screen name='CreateChannel' component={CreateChannelScreen} />
    </ModalStack.Navigator>
  );
}

function ChatComponent() {
  return (
    <ChatStack.Navigator
      screenOptions={{
        headerStyle: {
          backgroundColor: '#5b3a70'
        },
        headerTintColor: '#ffffff',
        headerTitleStyle: {
          fontSize: 22
        }
      }}
    >
      <ChatStack.Screen
        name='Home'
        component={HomeScreen}
        options={({ navigation }) => ({
          headerRight: () => (
            <IconButton
              icon='plus'
              size={28}
              iconColor='#ffffff'
              onPress={() => navigation.navigate('BrowseChannels')}
            />
          )
        })}
      />
      <ChatStack.Screen
        name='BrowseChannels'
        component={BrowseChannelsScreen}
        options={({ navigation }) => ({
          headerRight: () => (
            <IconButton
              icon='plus'
              size={28}
              iconColor='#ffffff'
              onPress={() => navigation.navigate('CreateChannel')}
            />
          )
        })}
      />
      <ChatStack.Screen
        name='Chat'
        component={ChatScreen}
        options={({ route }) => ({
          title: route.params.channel.name
        })}
      />
    </ChatStack.Navigator>
  );
}
Let's test the browse channels functionality by logging in as another user.

After logging in, if you navigate to the browse screen using the "Add" icon button, you should see the channel created earlier by the other user.

Let's say hello!

Conclusion
Amazing, you've completed the second part of this tutorial series and made your chat app even better. By implementing screens and functionality to allow users to create, discover and join channels, your users can beginning having meaningful conversations. You also used the Gifted Chat React Native library and ChatKitty to build a chat screen to send and receive real-time messages in minutes. It doesn't get much easier than that. Congratulations! 🍾
What's next?
In the next post of this series, we'll be handling what happens when a user is away from a chat screen or offline. We'll be using in-app notifications to inform a user when a new message is received, or relevant action happens in a channel they've joined. We'll also be using Expo push notifications to inform users about new messages when they're not connected to your app and are offline. Stay tuned for more. 🔥
Like always, if you have any questions, comments or need help with any part of this article, join our Discord Server where you can ask questions, discuss what you're working on, and I'll be more than happy to help.
You can find the complete source code for this project inside this GitHub repository.
👉 Checkout the other blog posts in this series:
Creating an Expo React Native chat app with Firebase Authentication
Adding direct messaging, typing indicators and chat presence notifications
This article contains materials adapted from "Chat app with React Native" by Aman Mittal, originally published at Heartbeat.Fritz.Ai.
This article features an image by Volodymyr Hryshchenko.